Reasons For Using Quarkus
Optimized For Containers
Java did have a bad reputation for having high resource consumption and slow starts, but modern applications are run in containers, which need to start quickly, consume few resources (CPU, memory), and be small because these performance metrics directly translate to the cost of applications in the cloud. Quarkus is solving this problem.
Quarkus has been designed to create applications that start quickly and have excellent efficiency and performance. It uses a concept of build time processing to move as much processing as possible from runtime to compile time. The memory footprint is one of the factors directly impacting the cloud computing pricing.
Quarkus is designed for containers as the main packaging format utilized in cloud. It comes with tools to build and deploy containers in a single step to the cloud. Quarkus also supports features that promote integration with the cloud platforms (e.g., exposing health- related information, externalizing configuration directly in the platform, etc.), which are integral for a positive user experience in the cloud environment.
Additionally, the Dockerfile and the docker folder is structured in a optimized way, which makes only the changed layers to be built and transmitted when you pull, build and push docker images.
Excerpt of the automatically created docker file src/main/docker/Dockerfile.jvm:
# ...
# We make four distinct layers so if there are application changes the library layers can be re-used
COPY --chown=185 target/quarkus-app/lib/ /deployments/lib/
COPY --chown=185 target/quarkus-app/*.jar /deployments/
COPY --chown=185 target/quarkus-app/app/ /deployments/app/
COPY --chown=185 target/quarkus-app/quarkus/ /deployments/quarkus/
# ...
Structure of target/quarkus-app/ folder after running mvn package:
├── app
│  └── my-first-quarkus-app-1.0.0-SNAPSHOT.jar
├── lib
│  ├── boot
│  │  ├── io.quarkus.quarkus-bootstrap-runner-3.21.1.jar
│  │  ├── ...
│  └── main
│      ├── com.aayushatharva.brotli4j.brotli4j-1.16.0.jar
│      ├── ...
├── quarkus
│  ├── generated-bytecode.jar
│  ├── quarkus-application.dat
│  └── transformed-bytecode.jar
├── quarkus-app-dependencies.txt
└── quarkus-run.jar
GraalVM & Native Image
If you decide that you wanna deploy a native image using GraalVM (because you wanna start more quickly and use less disk space and memory) then you only need to specify a flag at build time. Other than that nothing needs to be changed.
Native compilation commands:
# Utilizing Maven profile
$ ./mvnw package -Pnative
# Gradle needs to use the system property directly
$ ./gradlew build -Dquarkus.package.type=native
# Or quarkus CLI for general approach
$ quarkus build --native
Uses Known APIs and Standards
Quarkus uses standards like MicroProfile and Jakarta EE and popular open-source frameworks such as Hibernate, Vertx, Apache Camel or RESTEasy. This allows developers to reuse their expertise and years of practice with these libraries when they start working with Quarkus.
Helpful Quarkus Specific APIs
Quarkus implements a bunch of APIs and libraries with a sensible defaults and makes their integration very easy. It feels like they’re native components of Quarkus, e.g. GraphQL, gRPC, Qute Templating Engine.
Exceptional Developer Experience
Dev Mode
Quarkus provides a feedback loop that allows developers to test their code as
they develop it without having to restart the actual application or perform any other kind
of ceremonial tasks. In the Dev modeQuarkus watches source files, configuration settings, resources and dependencies and recompiles and restarts the application in the background whenever any one of them changes. You only need trigger Quarkus by sending a request or execute a test. The original JVM is used to reload the application. Tests are automatically executed in the background, allowing you to continue working with your application.
This feedback loop not only makes the development processes faster, but it’s also an essential learning tool. Developers get to see what works and what doesn’t very fast, free of repetitiveness, which helps them to learn things quickly.
Starting the Dev mode:
# via maven
$ mvn quarkus:dev
$ ./mvnw quarkus:dev # alternatively
# via quarkus cli
$ quarkus dev
To verify it, e.g. just change a source file and reload your it in the browser. You should see console logs iny your terminal informing about the reoload. You can also trigger a reload in the terminal by pressing the s key.
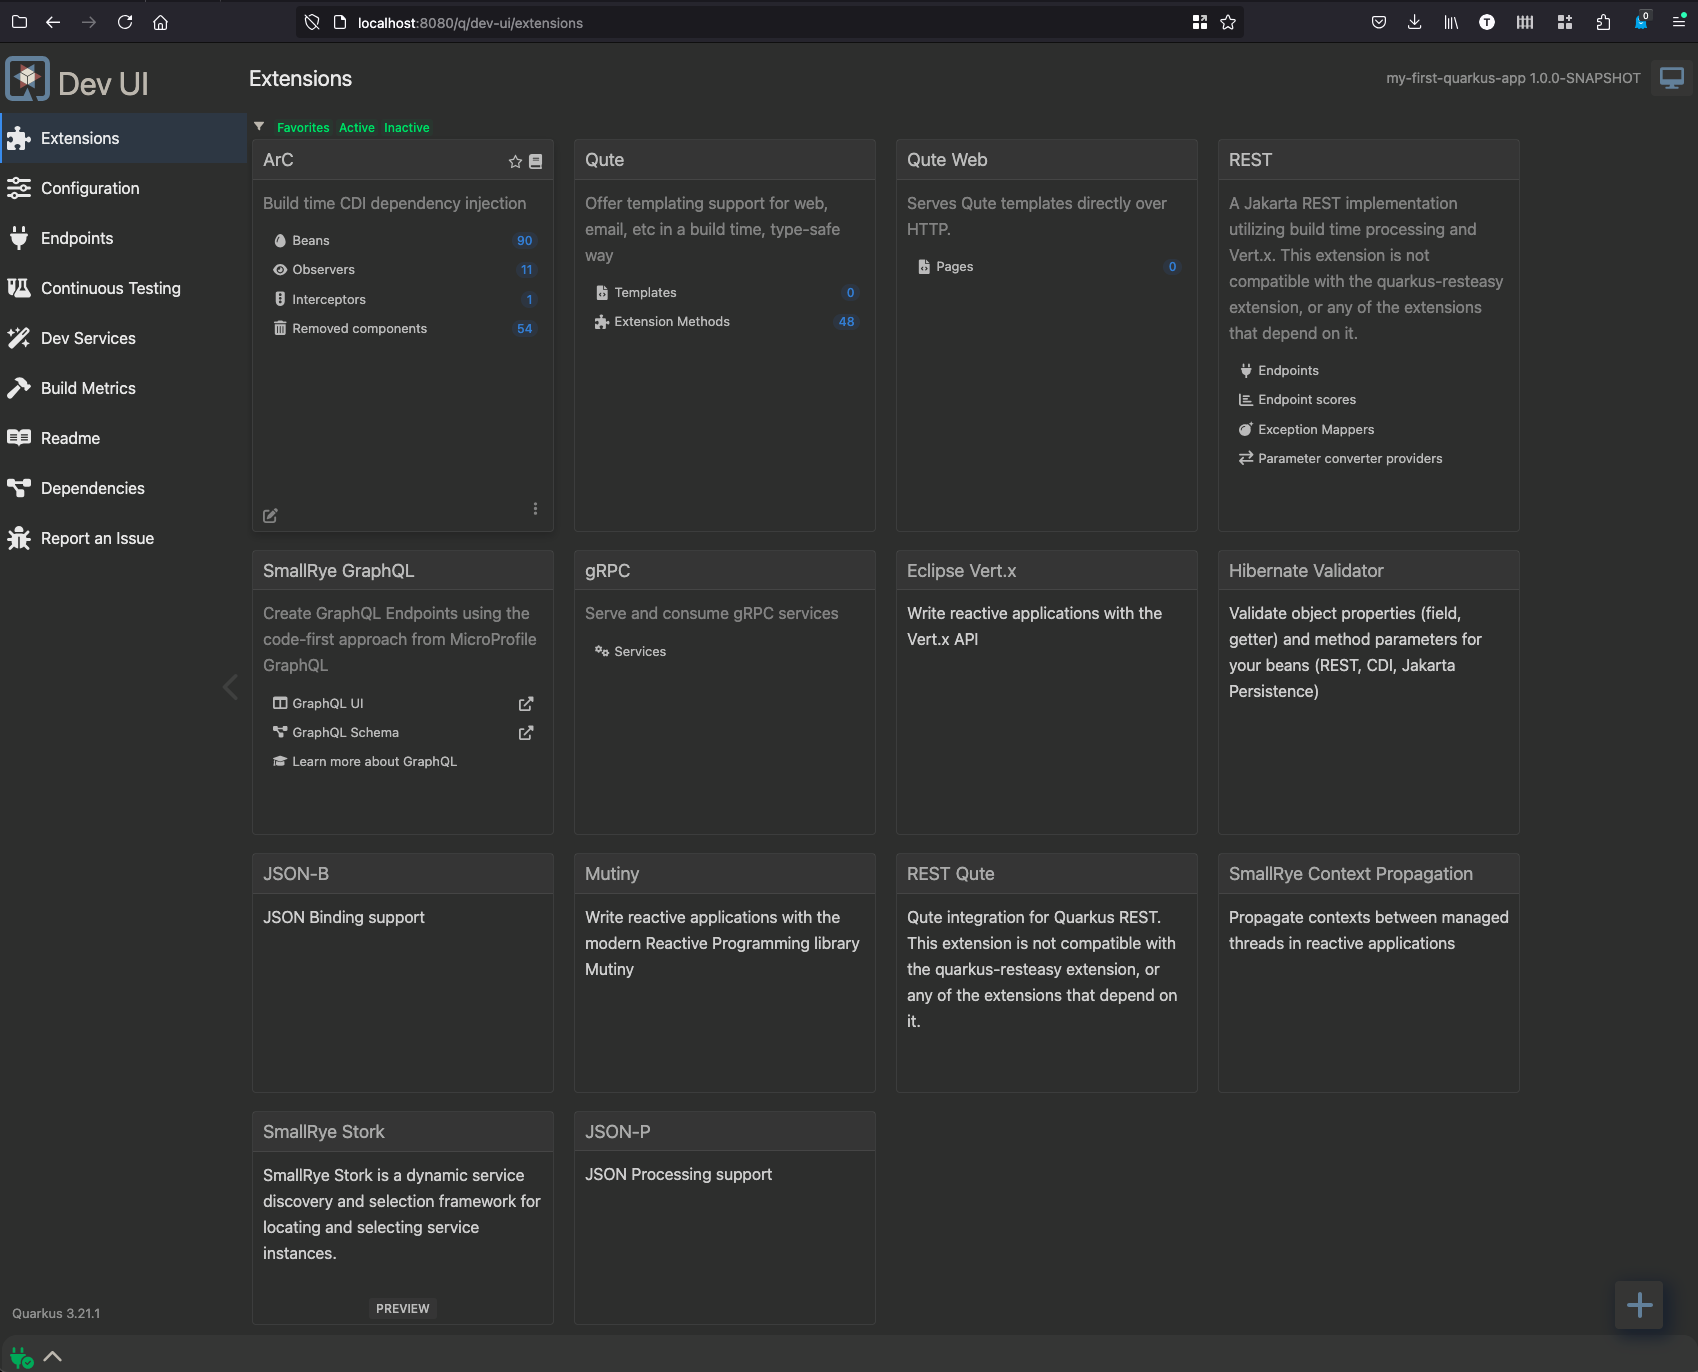
Dev UI
Dev UI is a tool with a Web UI. Its gives you insights about your application when it runs in Dev mode. You can interact with it and even change its state.
It visualizes some framework level abstractions that your app is using. You can use it like a debugger to gain insight into your app.
Using Dev UI you can accomplish things like:
-
List all configuration keys and values (this can be invaluable, especially if you have multiple sources of configuration that supply different values for the same keys)
-
List all CDI beans in the application, and for each of them, list their associated interceptors and priorities
-
List CDI beans detected during the build as unused, therefore not included in the resulting application
- List JPA entities along with their mapping to database tables.
- Wipe data from a development database to be able to start from scratch
- If you are using the Scheduler extension to schedule periodic tasks, you can manually trigger a task’s execution outside the schedule
- Re-run unit tests with a single click
- View reports from completed test runs
The architecture allows each Quarkus extension separately to plug its own tools into the Dev UI, so the complete list of options depends on which extensions the Quarkus application includes.
You can navigate to the DEV UI by opening the URL http://localhost:8080/q/dev-ui in your browser.
You can also open the DEV UI automatically if you run your app in DEV mode and press the d key in the terminal.
The screenshot below shows the Dev UI with the extension panel open, which show all installed extensions:
Dev Services
Using external services like message brokers and databases is very easy in Quarkus. Quarkus runs and manages such services for you automatically in Dev or Test mode, if following requirements are met:
- A container environment is available (Docker or Podman)
- Your service supports Dev Services
- You don’t provide any configuration to your service
If the above requirements are fulfilled, Quarkus will try to run an instance of that service (usually using Testcontainers) and take care of wiring it with your application.
Your can learn more about Dev services and supported services at Quarkus Dev Services.
Great Ecosystem & Docs
Docs & Guides. Particularly the SmallRye project needs a to be mentioned as it implements the Microprofile and other useful APIs.